> ## Documentation Index
> Fetch the complete documentation index at: https://docs.garmentflow.ai/llms.txt
> Use this file to discover all available pages before exploring further.
# Create an order
> Open an order — directly or by converting an approved quotation — build the line-up, and drive it through the work-phase spine toward shipment.
An [order](/reference/glossary#order)
is how a customer's commitment lands as a live record in the platform. Open
the order, build its line-up of
[styles](/reference/glossary#style),
colorways, sizes, quantities, and unit prices, and drive it through the
[work-phase spine](/concepts/order-lifecycle) toward shipment.
## What this workflow achieves
You end this workflow with a confirmed order that is progressing toward
shipment — a single record carrying the styles the customer bought, the
colorways and sizes per style, the per-piece prices, the commercial currency
and trade terms, and the ship date the rest of the business is planning
against. From here:
* the order's [styles](/modules/styles) carry their own pin onto the BOM,
cost sheet, and MO versions the order is working from,
* a
[manufacturing order (MO)](/reference/glossary#mo-manufacturing-order)
can be issued against the order's pinned versions when production is ready
to begin,
* factory orders, purchase orders, shipments, invoices, and customer
payments all read the order as their anchor, and
* the [readiness](/concepts/readiness-engine-and-ai) view tracks what
inside each work-phase stage is still missing.
## When to use it
* A customer has committed to buy specific styles, colorways, and quantities,
and you need to open the live record the rest of the deal will hang off.
* An approved [quotation](/modules/quotations) is ready to convert into the
order it was offered against.
* A previous order needs to be re-run for the same customer — clone the
source order to seed a fresh one from the same styles, colorways, and
sizes.
If the styles do not yet exist, develop them first — see
[Develop a style](/modules/develop-a-style). If the costing isn't yet in
place, build the cost sheet first — see
[Build the cost sheet](/modules/build-the-cost-sheet).
## Prerequisites
* **A customer record** for the buyer. Set on the order header at create and
cannot be changed afterwards. Your administrator manages the customer
master.
* **At least one style to run** — a [style](/modules/styles) master the order
line will link to via `Style master No.`.
* **An approved [quotation](/modules/quotations)**, when the order is being
opened by convert. Direct create has no quotation prerequisite.
* **The relevant per-tenant lookup lists** the header pulls from —
currency, trade-term defaults, and destination options — set up by your
administrator.
* **An FX rate** in your tenant's FX-rate master for the order's currency on
or before the `Order date` (or today, when no order date is set). The
platform captures the rate at create.
* **Order write permission** for the user opening, editing, or driving the
order. Clone is restricted to a separate capability — typically
administrator or merchandiser — that your administrator configures.
## Roles involved
Users with order write permission open orders, build the line-up, set
prices, advance the work phase, change the commercial status, and convert
an approved quotation into an order. The platform gates these actions by
**capability**, not by job title — sales, merchandising, and administrator
roles that carry the capability may all act on an order. Sales users see
only the orders they are the assigned sales on; administrator, owner,
finance, and merchandiser roles see every order in the tenant. The clone
action is restricted to a separate capability.
## Step-by-step
1. **Open the order.**
* **From a [quotation](/modules/quotations).** Open the approved
quotation and choose **Convert to order**. A new order opens
carrying the customer, currency, every style line (with the link to
its style master where the quote was linked), every colorway, every
size, and every unit price, and the order keeps a back-link to the
source quotation. The source quotation is marked **Converted**.
* **From scratch.** Open the **Orders** module and choose **Create
order**. A new order opens, ready for the header.
* **From a previous order.** Open the source order and choose
**Clone**. A fresh order opens with the source's styles, colorways,
and sizes copied in and quantities reset to zero. Whether the BOM
and cost-sheet versions are cloned alongside is set by your
administrator on the tenant.
On any of the three paths, the platform assigns the new order its
`Order no.` — you do not pick it.
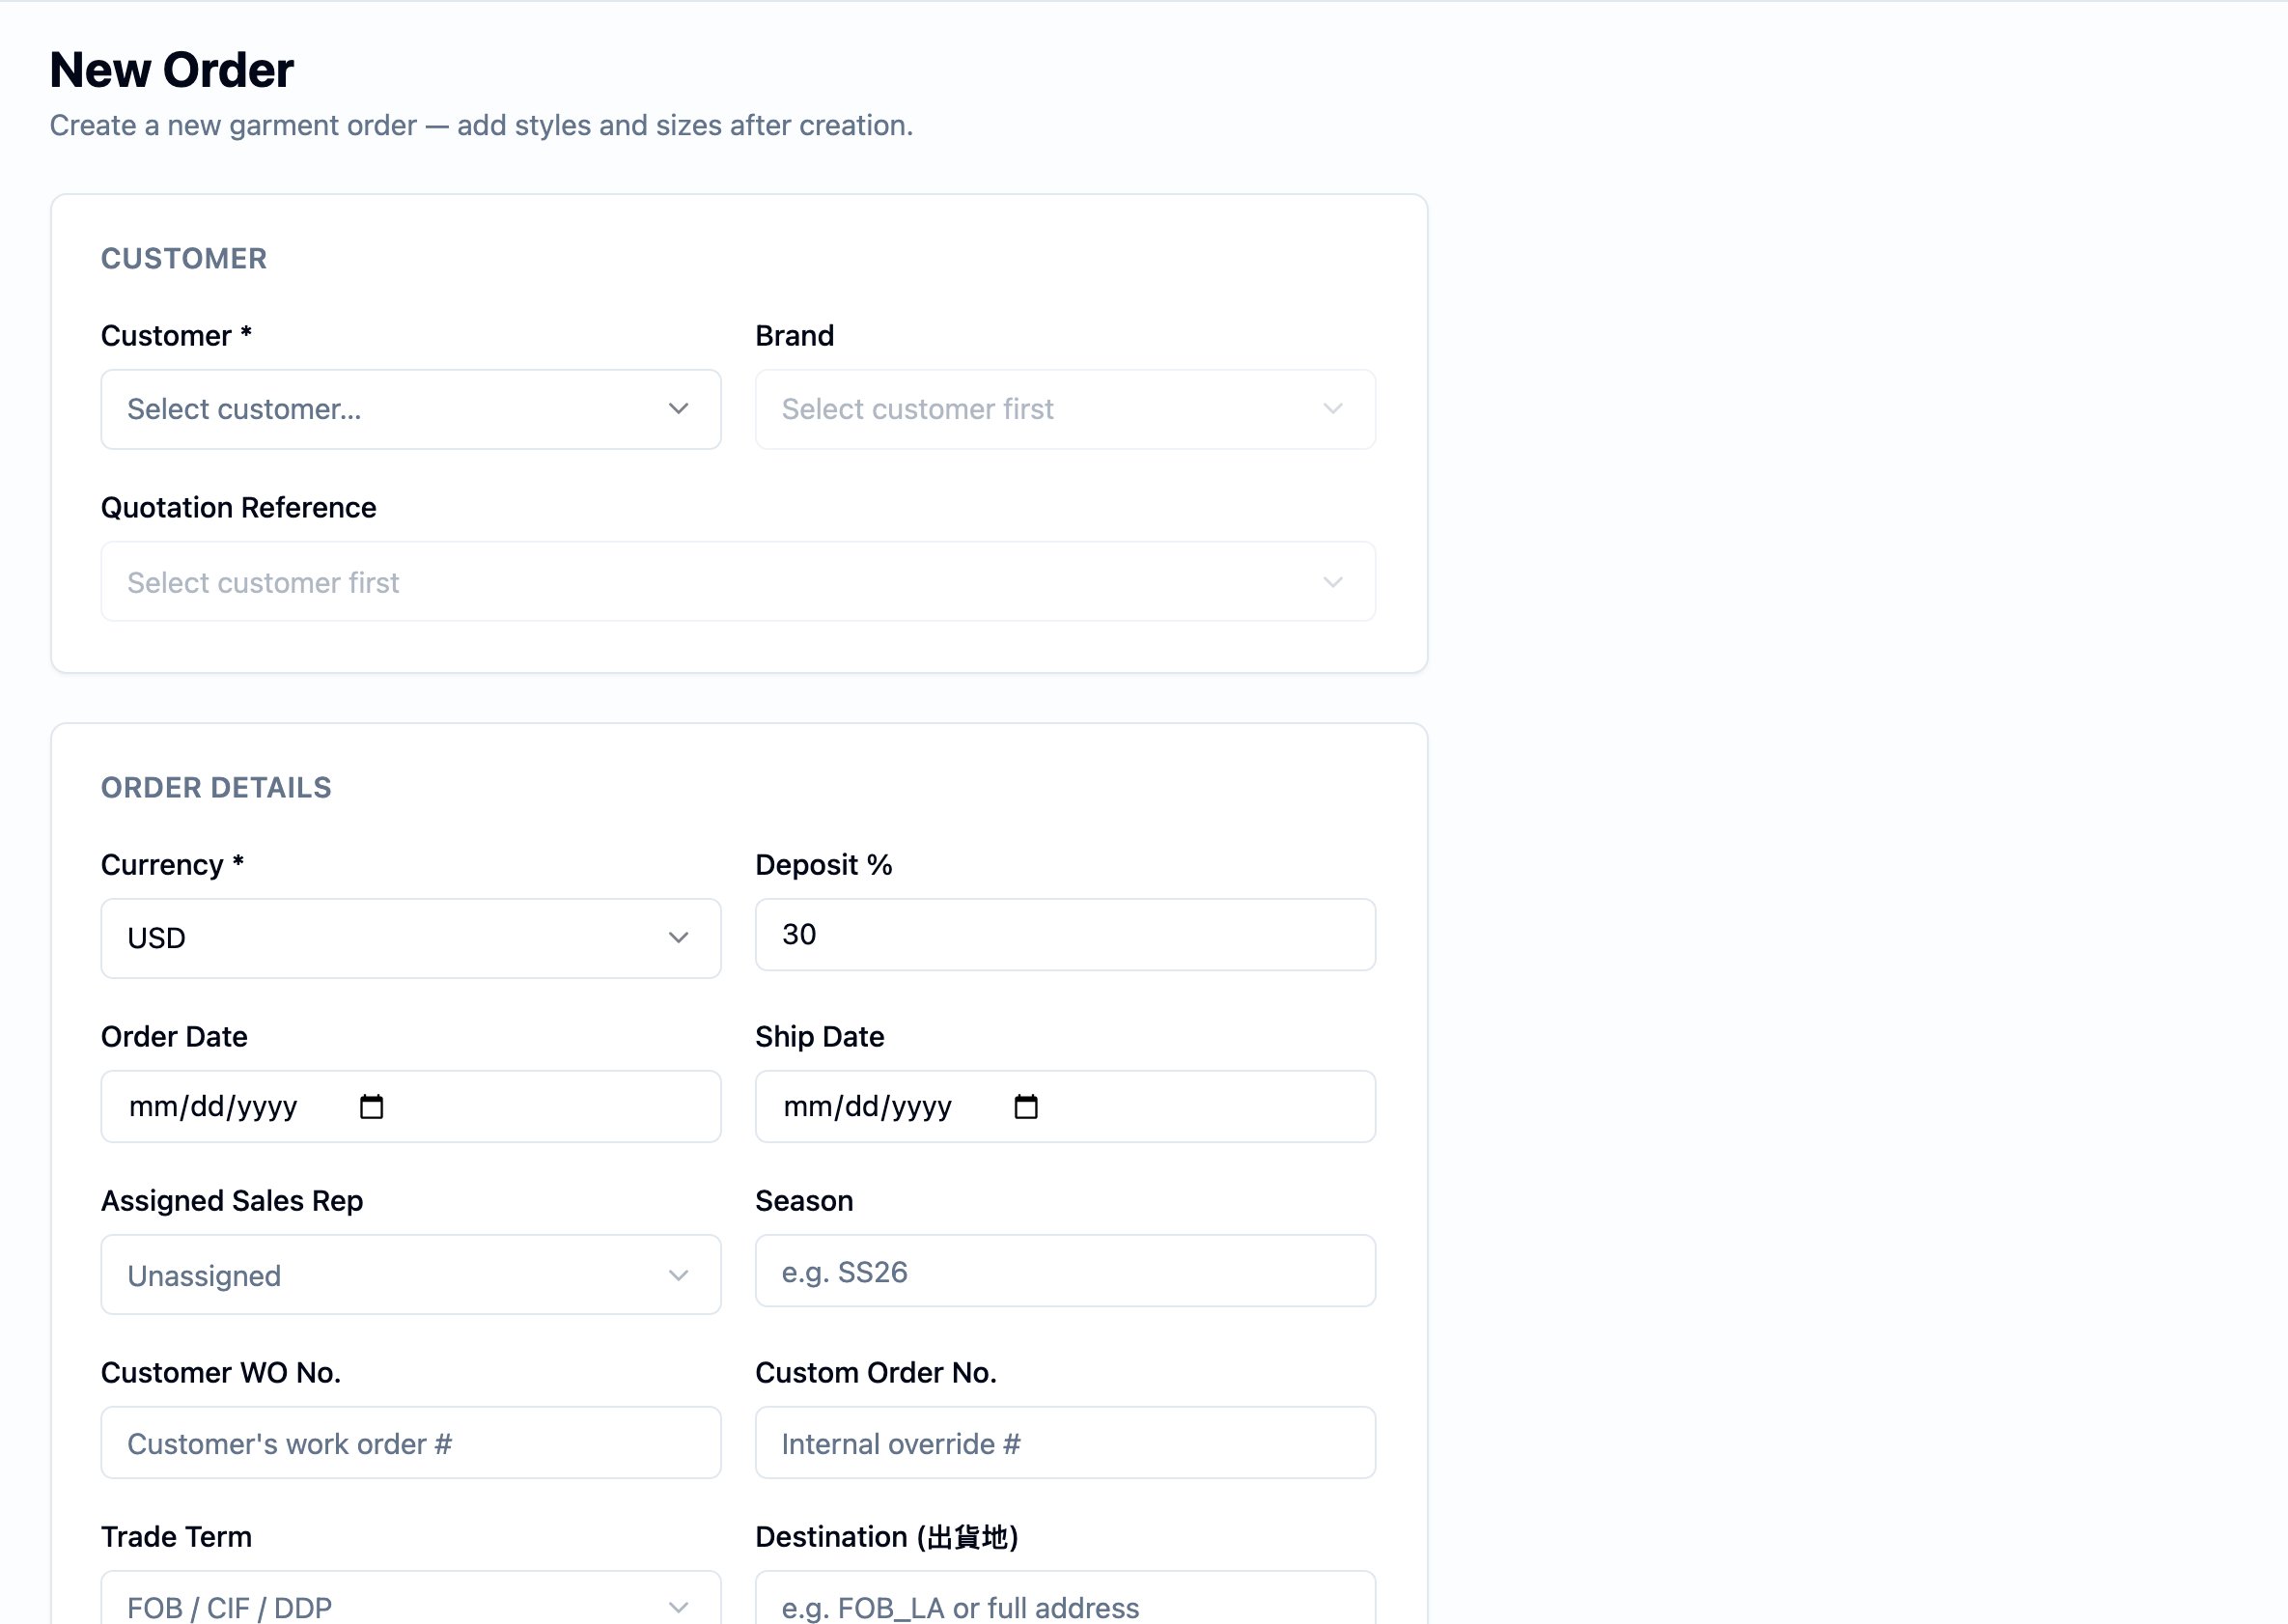 2. **Fill the header.**
* `Customer` — pick the buyer from the customer master. Required.
Cannot be changed after create.
* `Brand` — pick the customer's brand the order is for. Optional.
* `Assigned sales` — assign the sales user driving the deal.
Optional, but the assignment is what makes the order visible to a
sales-role user.
* `Currency` — pick the order's commercial currency. Required. The
platform captures the `FX rate` from the tenant's FX-rate master at
create against the `Order date` (or today, when no order date is
set).
* `Order date` — set the date the order is opened with the customer.
Optional, but it determines the date the `FX rate` lookup uses.
* `Ship date` — set the committed delivery date. Optional but the
date the order's backward-scheduled production timeline counts
back from.
* `Season` — type the selling season the order belongs to.
* `Trade term` — pick the commercial term that governs delivery
(e.g. `FOB`, `CIF`, `DDP`). The form's defaults are typical
values; the field accepts any term your tenant uses.
* `Destination` — set the shipping destination the trade term
applies to: a **port** for `FOB` or `CIF`, a **full delivery
address** for `DDP`. Leave it blank to pull the customer's default;
a freshly-typed destination is saved to the tenant lookup for
reuse.
* `Deposit %` — set the deposit percentage the customer is expected
to pay upfront. The form pre-fills the tenant default; edit as
needed.
* `Customer work-order no.` — optionally record the customer's own
work-order reference for the deal.
* `Custom order no.` — optionally set a display override of the
order number that prints on customer-facing exports.
* `Notes` — type any internal note for the order.
3. **Build the order's line-up.** Open the order's styles section and add
the styles the order runs.
2. **Fill the header.**
* `Customer` — pick the buyer from the customer master. Required.
Cannot be changed after create.
* `Brand` — pick the customer's brand the order is for. Optional.
* `Assigned sales` — assign the sales user driving the deal.
Optional, but the assignment is what makes the order visible to a
sales-role user.
* `Currency` — pick the order's commercial currency. Required. The
platform captures the `FX rate` from the tenant's FX-rate master at
create against the `Order date` (or today, when no order date is
set).
* `Order date` — set the date the order is opened with the customer.
Optional, but it determines the date the `FX rate` lookup uses.
* `Ship date` — set the committed delivery date. Optional but the
date the order's backward-scheduled production timeline counts
back from.
* `Season` — type the selling season the order belongs to.
* `Trade term` — pick the commercial term that governs delivery
(e.g. `FOB`, `CIF`, `DDP`). The form's defaults are typical
values; the field accepts any term your tenant uses.
* `Destination` — set the shipping destination the trade term
applies to: a **port** for `FOB` or `CIF`, a **full delivery
address** for `DDP`. Leave it blank to pull the customer's default;
a freshly-typed destination is saved to the tenant lookup for
reuse.
* `Deposit %` — set the deposit percentage the customer is expected
to pay upfront. The form pre-fills the tenant default; edit as
needed.
* `Customer work-order no.` — optionally record the customer's own
work-order reference for the deal.
* `Custom order no.` — optionally set a display override of the
order number that prints on customer-facing exports.
* `Notes` — type any internal note for the order.
3. **Build the order's line-up.** Open the order's styles section and add
the styles the order runs.
 For each style:
* **Add the style.** Pick the
[style](/modules/styles) master by `Style master No.` from the
style-master picker. Selecting the master pulls the customer-facing
style number, name, gender, finish, and fabric composition into the
line as a snapshot, and links the line to the master.
* **Add colorways.** Pick one or more colorways from the style
master's defined colors. Several colorways can be added under one
style line in a single step.
* **Apply a size template and enter quantities.** Apply a size
template (such as standard apparel or numeric sizing), and enter
the per-size `Qty` and `Unit price` for each colorway. Pricing is
per-size — a single colorway can carry different prices across
sizes.
* The platform refreshes the order's `Order amount` and
`Deposit amount` on the same write — there is no separate "compute
totals" step.
4. **Open each style in the context of this order to pin its versions.**
From the line-up, open the style. A banner shows which order you are
in; editing the BOM, cost sheet, or MO from there scopes your changes
to this order's version of the style, never to another order running
the same style. Approve the order's
[BOM](/reference/glossary#bom-bill-of-materials)
and [cost sheet](/modules/cost-sheet) before issuing the order's MO so
the version pinned for the run is the one the team has signed off on.
See [Styles](/modules/styles) and
[style vs. order vs. MO](/concepts/style-vs-order-vs-mo) for the
editing detail.
5. **Walk the order along the work-phase spine.** A new order opens in the
**inquiry** work phase. From there, the order advances one stage at a
time along the spine — through **development sample**, **quotation**,
**PI sent**, **PO received**, **procurement**, **production samples**,
**bulk production**, and **shipped**.
For each style:
* **Add the style.** Pick the
[style](/modules/styles) master by `Style master No.` from the
style-master picker. Selecting the master pulls the customer-facing
style number, name, gender, finish, and fabric composition into the
line as a snapshot, and links the line to the master.
* **Add colorways.** Pick one or more colorways from the style
master's defined colors. Several colorways can be added under one
style line in a single step.
* **Apply a size template and enter quantities.** Apply a size
template (such as standard apparel or numeric sizing), and enter
the per-size `Qty` and `Unit price` for each colorway. Pricing is
per-size — a single colorway can carry different prices across
sizes.
* The platform refreshes the order's `Order amount` and
`Deposit amount` on the same write — there is no separate "compute
totals" step.
4. **Open each style in the context of this order to pin its versions.**
From the line-up, open the style. A banner shows which order you are
in; editing the BOM, cost sheet, or MO from there scopes your changes
to this order's version of the style, never to another order running
the same style. Approve the order's
[BOM](/reference/glossary#bom-bill-of-materials)
and [cost sheet](/modules/cost-sheet) before issuing the order's MO so
the version pinned for the run is the one the team has signed off on.
See [Styles](/modules/styles) and
[style vs. order vs. MO](/concepts/style-vs-order-vs-mo) for the
editing detail.
5. **Walk the order along the work-phase spine.** A new order opens in the
**inquiry** work phase. From there, the order advances one stage at a
time along the spine — through **development sample**, **quotation**,
**PI sent**, **PO received**, **procurement**, **production samples**,
**bulk production**, and **shipped**.
 Some advances are taken manually
by the team when each step is done; others happen automatically the
moment the platform sees a triggering event:
* **PI sent** is advanced automatically when a proforma invoice is
created for the order.
* **Procurement** is advanced automatically when the order's first
BOM is approved.
* **Bulk production** is advanced automatically when the
pre-production sample is approved.
* **Shipped** is advanced automatically when a shipment for the
order goes in transit.
The remaining advances — past **inquiry**, the **development
sample**, the **PI**, and **procurement** — are taken manually when
each step is done. The work phase moves forward one stage at a time
and is not rewound. See
[order lifecycle](/concepts/order-lifecycle) for the canonical model.
6. **Confirm the deal on the commercial side.** Alongside the work
phase, the order carries a commercial status the team sets to
communicate where the deal stands. Move the status from **inquiry**
through **quotation** to **confirmed** when the customer has
committed, so the rest of the team can plan against a real deal.
When you upload an order-confirmation document to the order's
**Documents** surface, the platform prompts you with a one-click
action to mark the order **confirmed** — a suggestion you can take
or dismiss, not an automatic transition. The one place the platform
writes status itself is when production work is started on the order
— opening the order's production record flips the status to
**production**.
7. **Track progress on the order detail.** The order's detail page
organizes the day-to-day work into four sections — **Overview** for
the headline view, the readiness snapshot, and the backward
schedule; **Style & Spec** for the style line-up and the styling
artifacts (grading, production spec, product cards, style summary,
samples); **Shipment & Documents** for production, purchase orders,
subcontracts, customer shipments, outbound legs, and attached files;
and **Finance & Communication** for the payment plan, invoices, AP
summary, and the order's conversation thread. See the
[Order page](/modules/orders#how-the-order-detail-page-is-organized)
for the layout in full. As the work moves on, the order's detail
surfaces:
* **Payment progress.** A progress bar shows how much of the order
total has been received against the order, derived from the
receipts recorded against it. It caps at 100% but still surfaces
an overpayment if one occurs, and shows the outstanding balance.
* **Shipment status.** The order's shipments show what has been
planned and what has left the factory, so you can see fulfillment
against the ordered quantities.
* **Readiness.** The
[readiness](/concepts/readiness-engine-and-ai) view applies the
order's backward-scheduled timeline and highlights milestones
that are on time, at risk, or late — your early warning that a
ship date is in danger.
## Decision points
* **Convert vs. direct-create vs. clone.** Convert when an approved
[quotation](/modules/quotations) is what the customer has accepted —
the customer, currency, styles, colorways, sizes, and unit prices
carry forward, and the source quote stays linked as the back-reference.
Direct-create when there is no quotation in play. Clone when the same
customer is re-running a previous order — the styles, colorways, and
sizes copy in, quantities reset to zero, and you fill the new
quantities for the re-run.
* **Approve upstream before issuing the MO.** Approve the order's
BOM, finalise its grading, and attach the customer's brand-tab
library items before issuing the MO — the MO workbook renders only
from records that are approved and complete. See
[Build a manufacturing order (MO)](/modules/build-an-mo).
* **Cancel vs. complete.** Cancel an order (status → **cancelled**) when
the deal is off. Mark it complete (status → **completed**) when the
deal is closed from the commercial side. Both are terminal — header and
line edits are refused from this point on, and the record stays on
file as the audit trail. Orders cannot be deleted.
## Business rules in play
These rules govern this workflow. They are documented once on the
[Order page](/modules/orders); this workflow only summarizes.
* **One order is per-customer and per-currency**, and the customer
cannot be changed after create. See
[Business rules](/modules/orders#business-rules).
* **`Order no.` is assigned at create and never changes**, by your
tenant's numbering scheme.
* **`Currency` and `FX rate` are captured at create.** The rate is read
from the tenant's FX-rate master against the `Order date` (or today,
when no order date is set).
* **The order's totals are derived from the size grid, not entered.**
`Order amount` is the sum of `Qty × Unit price` across the grid;
`Deposit amount` is `Order amount × Deposit % / 100`. Both refresh
on the same write as any change.
* **An order starts in the inquiry work phase**, and the spine advances
one stage at a time. See
[order lifecycle](/concepts/order-lifecycle).
* **Edits are refused on a terminal status.** Once the order is
**completed** or **cancelled**, header and line edits are refused.
* **Orders are not deleted.** Cancellation is the canonical way to stop
work on a deal that is no longer happening.
## Dates set or affected
* **`Order date`** — set by the user on the header at create; optional.
Used to look up the `FX rate` snapshot, and printed on the order's
documents as the order's date.
* **`Ship date`** — the committed delivery date set by the user;
optional. The date the order's backward-scheduled production timeline
counts back from. Editable after create — changing it recomputes the
milestone target dates.
* **Milestone target dates** — derived dates the platform produces by
reading your tenant's lead-time offsets and counting back from
`Ship date`. Each target date is the latest the step can happen and
still hit the ship date; the chain reflects the offsets your
administrator has set up, so it carries your own lead times rather
than generic assumptions.
* **`Created`, `Last updated`** — set by the platform.
## What happens next
A confirmed order is the bridge between sales and production. From an
open order:
1. **Issue the order's [MOs](/concepts/style-vs-order-vs-mo).** When
the order's BOM and cost sheet for a given style are signed off,
issue the MO for that style. Issuing freezes the MO's pinned
versions and its rendered content, so the factory sees the picture
the order team stands behind.
2. **Drive [production](/modules/production).** Factory orders cover
the outsourced work — one factory order can span several orders and
styles at once, so the order's styles may be grouped with others on
a shared factory order. Purchase orders for fabric and trims are
raised through the factory order, so buying traces back through the
factory order to the order it serves.
3. **Cut [shipments](/modules/shipments) from the order.** A shipment
going in transit advances the order's work phase to **shipped**
automatically. When the order ships in several batches to different
places — or the transport mode changes, say sea to air — each
shipment batch can carry its own destination without changing the
order's default.
4. **Settle the [finance](/modules/finance) side.** The proforma
invoice, the deposit and balance invoices, the payment plan, and the
customer receipts all read the order as their anchor. The deposit
percentage on the order header is what the payment plan's deposit
milestone is sized against; creating a PI also advances the order's
work phase to **PI sent**.
When the deal is closed, mark the order's commercial status
**completed**. When the deal is off, mark it **cancelled**. Both are
terminal — the order stays on file as the audit record either way.
## Best practices
* **Convert approved quotations rather than retyping.** The convert
path carries the customer, currency, styles, colorways, sizes, and
unit prices forward in one step and leaves a clean back-link to the
source quote.
* **Open every line against a style master.** Linking via
`Style master No.` ties the line to a real style record so the
order's BOM, cost sheet, MO, and readiness all scope to the right
style.
* **Set the `Ship date` as accurately as you can.** It is the date the
backward-scheduled production timeline counts back from; an
optimistic ship date pulls every milestone with it.
* **Set the trade term and destination together.** The destination
depends on the trade term — a **port** for `FOB` or `CIF`, a
**full delivery address** for `DDP` — and the customer's defaults
pre-fill where you leave them blank.
* **Approve the BOM, finalise the grading, and attach brand-tab items
before issuing the MO.** The MO workbook renders only from records
that are approved and complete; the team is the gate. See
[Build a manufacturing order (MO)](/modules/build-an-mo).
* **Walk the work phase forward as each step is done.** The manual
advances are how the team signals operational progress to the rest
of the business; the automatic advances handle the rest.
* **Confirm on the commercial side as soon as the deal is real.** A
**confirmed** status is the signal the rest of the team plans
against — the styles, quantities, and ship date are commitments
from this point on.
* **Cancel rather than try to delete.** Orders cannot be removed once
opened; cancellation leaves a clear, auditable record that the deal
is off and stops further work without breaking downstream references.
## Related pages
* [Order](/modules/orders)
* [Order lifecycle](/concepts/order-lifecycle)
* [Style vs. order vs. MO](/concepts/style-vs-order-vs-mo)
* [Styles](/modules/styles)
* [Quotations](/modules/quotations)
* [Create a quotation](/modules/create-a-quotation)
* [Production](/modules/production)
* [Shipments](/modules/shipments)
* [Finance](/modules/finance)
Some advances are taken manually
by the team when each step is done; others happen automatically the
moment the platform sees a triggering event:
* **PI sent** is advanced automatically when a proforma invoice is
created for the order.
* **Procurement** is advanced automatically when the order's first
BOM is approved.
* **Bulk production** is advanced automatically when the
pre-production sample is approved.
* **Shipped** is advanced automatically when a shipment for the
order goes in transit.
The remaining advances — past **inquiry**, the **development
sample**, the **PI**, and **procurement** — are taken manually when
each step is done. The work phase moves forward one stage at a time
and is not rewound. See
[order lifecycle](/concepts/order-lifecycle) for the canonical model.
6. **Confirm the deal on the commercial side.** Alongside the work
phase, the order carries a commercial status the team sets to
communicate where the deal stands. Move the status from **inquiry**
through **quotation** to **confirmed** when the customer has
committed, so the rest of the team can plan against a real deal.
When you upload an order-confirmation document to the order's
**Documents** surface, the platform prompts you with a one-click
action to mark the order **confirmed** — a suggestion you can take
or dismiss, not an automatic transition. The one place the platform
writes status itself is when production work is started on the order
— opening the order's production record flips the status to
**production**.
7. **Track progress on the order detail.** The order's detail page
organizes the day-to-day work into four sections — **Overview** for
the headline view, the readiness snapshot, and the backward
schedule; **Style & Spec** for the style line-up and the styling
artifacts (grading, production spec, product cards, style summary,
samples); **Shipment & Documents** for production, purchase orders,
subcontracts, customer shipments, outbound legs, and attached files;
and **Finance & Communication** for the payment plan, invoices, AP
summary, and the order's conversation thread. See the
[Order page](/modules/orders#how-the-order-detail-page-is-organized)
for the layout in full. As the work moves on, the order's detail
surfaces:
* **Payment progress.** A progress bar shows how much of the order
total has been received against the order, derived from the
receipts recorded against it. It caps at 100% but still surfaces
an overpayment if one occurs, and shows the outstanding balance.
* **Shipment status.** The order's shipments show what has been
planned and what has left the factory, so you can see fulfillment
against the ordered quantities.
* **Readiness.** The
[readiness](/concepts/readiness-engine-and-ai) view applies the
order's backward-scheduled timeline and highlights milestones
that are on time, at risk, or late — your early warning that a
ship date is in danger.
## Decision points
* **Convert vs. direct-create vs. clone.** Convert when an approved
[quotation](/modules/quotations) is what the customer has accepted —
the customer, currency, styles, colorways, sizes, and unit prices
carry forward, and the source quote stays linked as the back-reference.
Direct-create when there is no quotation in play. Clone when the same
customer is re-running a previous order — the styles, colorways, and
sizes copy in, quantities reset to zero, and you fill the new
quantities for the re-run.
* **Approve upstream before issuing the MO.** Approve the order's
BOM, finalise its grading, and attach the customer's brand-tab
library items before issuing the MO — the MO workbook renders only
from records that are approved and complete. See
[Build a manufacturing order (MO)](/modules/build-an-mo).
* **Cancel vs. complete.** Cancel an order (status → **cancelled**) when
the deal is off. Mark it complete (status → **completed**) when the
deal is closed from the commercial side. Both are terminal — header and
line edits are refused from this point on, and the record stays on
file as the audit trail. Orders cannot be deleted.
## Business rules in play
These rules govern this workflow. They are documented once on the
[Order page](/modules/orders); this workflow only summarizes.
* **One order is per-customer and per-currency**, and the customer
cannot be changed after create. See
[Business rules](/modules/orders#business-rules).
* **`Order no.` is assigned at create and never changes**, by your
tenant's numbering scheme.
* **`Currency` and `FX rate` are captured at create.** The rate is read
from the tenant's FX-rate master against the `Order date` (or today,
when no order date is set).
* **The order's totals are derived from the size grid, not entered.**
`Order amount` is the sum of `Qty × Unit price` across the grid;
`Deposit amount` is `Order amount × Deposit % / 100`. Both refresh
on the same write as any change.
* **An order starts in the inquiry work phase**, and the spine advances
one stage at a time. See
[order lifecycle](/concepts/order-lifecycle).
* **Edits are refused on a terminal status.** Once the order is
**completed** or **cancelled**, header and line edits are refused.
* **Orders are not deleted.** Cancellation is the canonical way to stop
work on a deal that is no longer happening.
## Dates set or affected
* **`Order date`** — set by the user on the header at create; optional.
Used to look up the `FX rate` snapshot, and printed on the order's
documents as the order's date.
* **`Ship date`** — the committed delivery date set by the user;
optional. The date the order's backward-scheduled production timeline
counts back from. Editable after create — changing it recomputes the
milestone target dates.
* **Milestone target dates** — derived dates the platform produces by
reading your tenant's lead-time offsets and counting back from
`Ship date`. Each target date is the latest the step can happen and
still hit the ship date; the chain reflects the offsets your
administrator has set up, so it carries your own lead times rather
than generic assumptions.
* **`Created`, `Last updated`** — set by the platform.
## What happens next
A confirmed order is the bridge between sales and production. From an
open order:
1. **Issue the order's [MOs](/concepts/style-vs-order-vs-mo).** When
the order's BOM and cost sheet for a given style are signed off,
issue the MO for that style. Issuing freezes the MO's pinned
versions and its rendered content, so the factory sees the picture
the order team stands behind.
2. **Drive [production](/modules/production).** Factory orders cover
the outsourced work — one factory order can span several orders and
styles at once, so the order's styles may be grouped with others on
a shared factory order. Purchase orders for fabric and trims are
raised through the factory order, so buying traces back through the
factory order to the order it serves.
3. **Cut [shipments](/modules/shipments) from the order.** A shipment
going in transit advances the order's work phase to **shipped**
automatically. When the order ships in several batches to different
places — or the transport mode changes, say sea to air — each
shipment batch can carry its own destination without changing the
order's default.
4. **Settle the [finance](/modules/finance) side.** The proforma
invoice, the deposit and balance invoices, the payment plan, and the
customer receipts all read the order as their anchor. The deposit
percentage on the order header is what the payment plan's deposit
milestone is sized against; creating a PI also advances the order's
work phase to **PI sent**.
When the deal is closed, mark the order's commercial status
**completed**. When the deal is off, mark it **cancelled**. Both are
terminal — the order stays on file as the audit record either way.
## Best practices
* **Convert approved quotations rather than retyping.** The convert
path carries the customer, currency, styles, colorways, sizes, and
unit prices forward in one step and leaves a clean back-link to the
source quote.
* **Open every line against a style master.** Linking via
`Style master No.` ties the line to a real style record so the
order's BOM, cost sheet, MO, and readiness all scope to the right
style.
* **Set the `Ship date` as accurately as you can.** It is the date the
backward-scheduled production timeline counts back from; an
optimistic ship date pulls every milestone with it.
* **Set the trade term and destination together.** The destination
depends on the trade term — a **port** for `FOB` or `CIF`, a
**full delivery address** for `DDP` — and the customer's defaults
pre-fill where you leave them blank.
* **Approve the BOM, finalise the grading, and attach brand-tab items
before issuing the MO.** The MO workbook renders only from records
that are approved and complete; the team is the gate. See
[Build a manufacturing order (MO)](/modules/build-an-mo).
* **Walk the work phase forward as each step is done.** The manual
advances are how the team signals operational progress to the rest
of the business; the automatic advances handle the rest.
* **Confirm on the commercial side as soon as the deal is real.** A
**confirmed** status is the signal the rest of the team plans
against — the styles, quantities, and ship date are commitments
from this point on.
* **Cancel rather than try to delete.** Orders cannot be removed once
opened; cancellation leaves a clear, auditable record that the deal
is off and stops further work without breaking downstream references.
## Related pages
* [Order](/modules/orders)
* [Order lifecycle](/concepts/order-lifecycle)
* [Style vs. order vs. MO](/concepts/style-vs-order-vs-mo)
* [Styles](/modules/styles)
* [Quotations](/modules/quotations)
* [Create a quotation](/modules/create-a-quotation)
* [Production](/modules/production)
* [Shipments](/modules/shipments)
* [Finance](/modules/finance)